Hello,
The following will allow to send all users created from the Create User Home Page Action in the Self Service Web Interface for approval:
-
On the computer, where the Web Interface is installed, start the Web Interface Customization tool.
-
In the Interface type drop-down list, select Self Service.
-
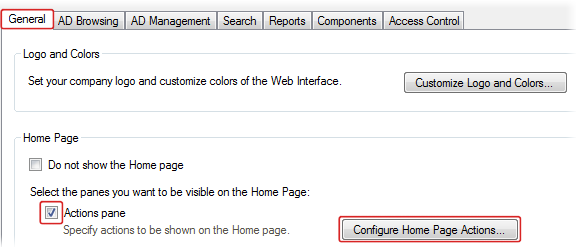
Activate the General tab, uncheck the Do not show the Home Page option, select the Actions pane option, and click Configure Home Page Actions.

-
Click the Add button located at the bottom of the Home Page Actions dialog.
-
Select the Create New action and choose the User object type.
-
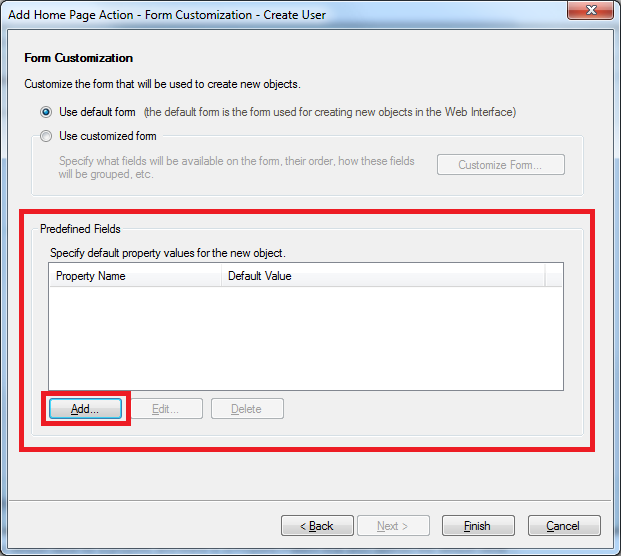
On the 4th step of the Add Home Page Action wizard, click Add in the Predefined Fields section.

-
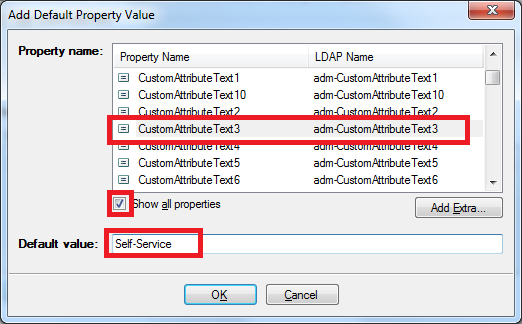
In the Add Default Property Value dialog box that appears, select Show all properties and choose CustomAttributeText3 in the Property name field.
-
Type Self-Service in the Default value field, then click OK and Finish.

-
Create the following Business Rule that will activate before creating a User:

The text of the script in the Run PowerShell Script action should be as follows:
$Context.TargetObject.PutEx("ADS_PROPERTY_CLEAR", "adm-CustomAttributeText3", $NULL)
After you complete these steps, a new action called Create User will appear on the Self Service Web Interface.

All users created with the help of this Home Page Action will be assigned Adaxes custom property CustomAttributeText3 with the value of this property equal to Self-Service. As the action was configured for the Self Service Web Interface only, this will not affect the other Web Interface types. The Business Rule will look for this property, and, if it is equal to Self-Service, it will send the Create User operation for approval and clear the property.
Another option is to send an email containing the required properties of the user to the approver and cancel the operation. The approver will have to re-enter the user manually again. To do this, you need to perform all the steps as described above, but the Business Rule will be different:

Here, you can use value references to specify the necessary information about the user in the text of the email. See Value Reference Format. Here's a small example of what such an email can contain:
Dear Administrator,

Please, create the following user account:
User Name: %username%
First Name: %firstname%
Last Name: %lastname%
Department: %department%
Title: %title%
E-mail: %mail%

Regards, %adm-InitiatorFullName%