Hello,
The thing why it doesn't work before creating a user is that whenever you add/remove a user to or from a group, you modify the Member property of that group by adding the user's Distinguished Name (DN) to that property. And since a new user is not yet created, the user does not have a valid DN yet.
Also, you cannot change the Member Of property directly. This property can be changed by the system only and is a calculated property. This means that once you change membership of a group and modify the Member property of the group object, the system makes corresponding changes to the Member Of section of the objects that were added or removed.
As to implementing the fourth solution from my post, to implement it, you will need to customize the Web Interface form that is used for user creation and add a property that will be used to pass the list of group names, CustomAttributeText1. This is one of the Adaxes virtual properties that can store text data. Such properties are not stored in Active Directory, but you may use them as any other property of directory objects. You will be able to use this property to specify a list of groups that the user should be added to after creation. Each group should be specified by its SAMAccountName, and the groups in the list should be separated by commas.
Also, you will need to create two Business Rules. The first Business Rule will be launched before creating a user and will check whether the groups specified in the list actually exist in Active Directory. If the groups do not exist, the Business Rule will not allow to create the user specifying in the error message the names of the groups that were not found. The second Business Rule will be launched after creating a user and will add the user to the groups specified in the list.
I. Modify the Web Interface form for user creation
To add a field that will be used to specify the group list, you need to modify the Web Interface form for user creation. To do this:
- On the computer, where the Web Interface is installed, start the Web Interface Customization tool.
- Select the Web Interface that you want to configure in the Interface type drop-down list.
- Activate the AD Management tab and click Customize Forms and Views.

- In the Object types list (located on the left), select the User object type.
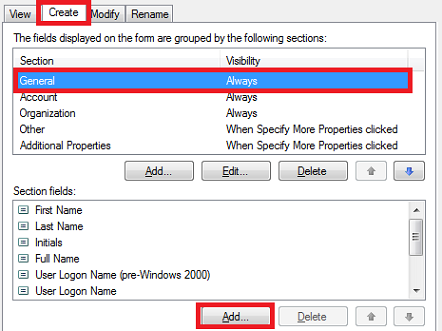
- Activate the Create tab.
- Select the section you would like to add the field to in the above list.
- Click the Add button located under the Section fields list.
- In the dialog box that appears, check the Show all properties option.
- Select CustomAttributeText1.
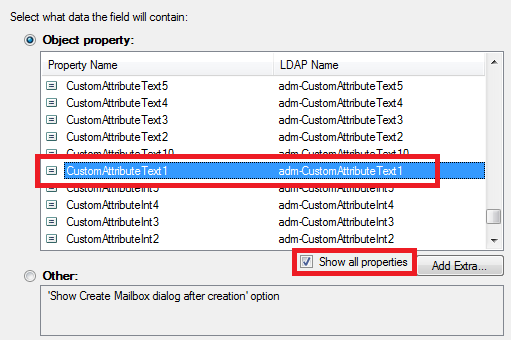
- Click OK 3 times.
II. Create Business Rule to check group names
To create a Business Rule that will be launched before creating a user and check group names passed by the virtual property:
-
Create a new Business Rule.
-
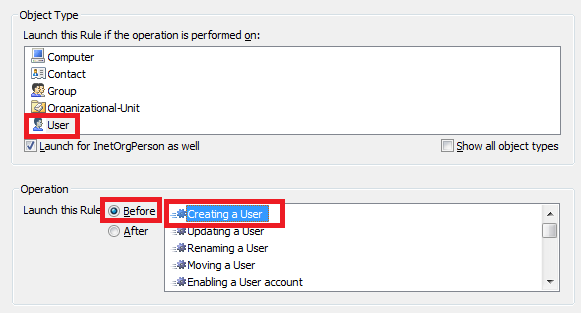
On the 2nd step of the Create Business Rule wizard, select User and Before Creating a User.
-
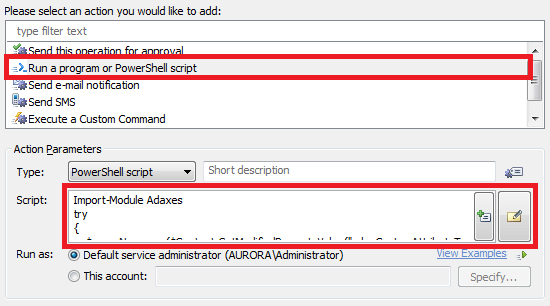
On the 3rd step, add the Run a program or PowerShell script action and paste the following script:
 Import-Module Adaxes
 try
 {
     $groupNames = ($Context.GetModifiedPropertyValue("adm-CustomAttributeText1")).Split(",")
 }
 catch
 {
     return
 }

 # Trim spaces at the beginning and at the end of each group name
 for ($i = 0; $i -lt $groupNames.Length; $i++)
 {
     $groupNames[$i] = $groupNames[$i].Trim()
 }

 # Get user domain name
 $domainName = $Context.GetObjectDomain("%distinguishedName%")

 # Check groups
 foreach ($groupName in $groupNames)
 {
     try
     {
         Get-AdmGroup -Identity $groupName -AdaxesService localhost -Server $domainName -ErrorAction Stop
     }
     catch
     {
         $Context.Cancel("The group with name $groupName was not found in domain $domainName")
     }
 }
-
Add a short description for the script and click OK.
-
Finish creation of the Business Rule.
III. Create Business Rule that will add users to groups
To create a Business Rule that will be launched after creating a user and add the user to the groups specified in the list:
-
Create a new Business Rule.
-
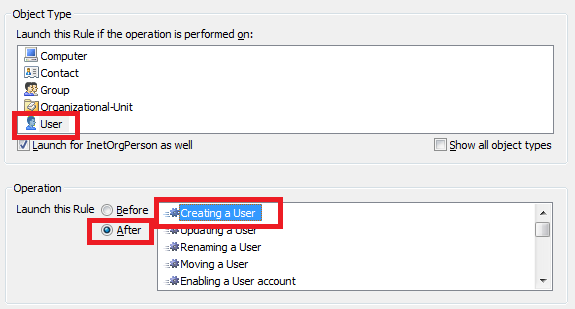
On the 2nd step of the Create Business Rule wizard, select User and After Creating a User.
-
On the 3rd step, add the Run a program or PowerShell script action and paste the following script:

 Import-Module Adaxes

 try
 {
     $groupNames = ($Context.TargetObject.Get("adm-CustomAttributeText1")).Split(",")
 }
 catch
 {
     return
 }

 # Trim spaces at the beginning and at the end of each group name
 for ($i = 0; $i -lt $groupNames.Length; $i++)
 {
     $groupNames[$i] = $groupNames[$i].Trim()
 }

 # Get user domain name
 $domainName = $Context.GetObjectDomain("%distinguishedName%")

 # Add user to groups
 foreach ($groupName in $groupNames)
 {
     Add-AdmGroupMember -Identity $groupName -AdaxesService localhost -Members %username% -Server $domainName
 }
-
Add a short description for the script and click OK.
-
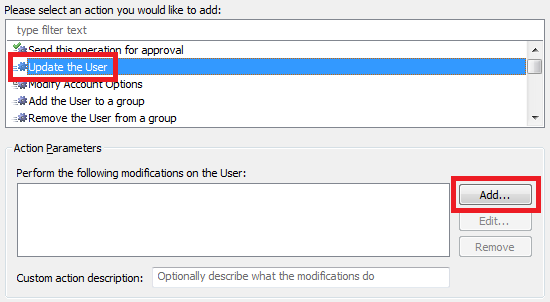
Click the Add Action button.

-
In the dialog box that appears, select the Update the User action and click Add.
-
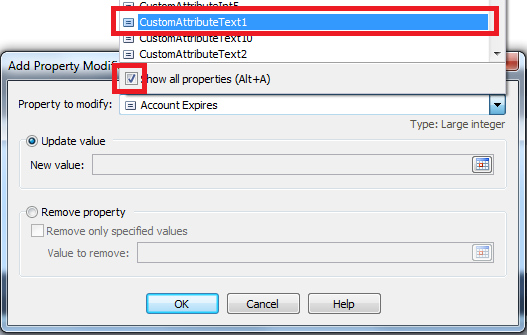
In the dialog box that appears, open the Property to modify drop-down list and select the Show all properties option.
-
Select CustomAttributeText1.
-
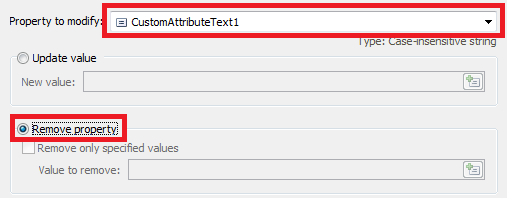
Switch the radio button to Remove property. This will clear the property as we no longer need it.
-
Click OK twice and finish creation of the Business Rule.
Also, since a name like CustomAttributeText1 will not tell much to your users about the meaning and the function of the field, you would probably like to give it your own name. See Customizing Display Names for AD Properties on how to do that.