Hello,
As far as we can recollect, the 'Denied Review' Scheduled Task was made for the following purpose: it should check whether the CustomAttributeText10 property is set to "Review In Progress" for the user. If the value for the property is "Review In Progress", it should check whether there are any pending Approval Requests for the user created by the 'Review Initiation' Task. If there are no such Approval Requests, it is assumed that the Request to postpone revision has been denied, and the Task should proceed to user deletion.
If the above is correct, then actually we came up with a more elegant solution that is less stressing for your environment. The thing is that you can create a Business Rule triggered after denying an Approval Request. The only issue is that you cannot do this from the UI, you need to use a script to create such a Business Rule.
What we suggest is that you can create a Business Rule triggered after denying an Approval Request. When the Business Rule is triggered, it will check with the help of the If PowerShell script returns True condition whether the initiator of the Approval Request is the "Review Initiation" Scheduled Task. If the initiator of the Approval Request is the "Review Initiation" Scheduled Task, the Business Rule will perform the actions related to user deletion.
To create such a Business Rule:
-
To create a Business Rule triggered after denying an Approval Request, first, you need to create an empty Business Rule executed After Updating an Approval Request with the help of a PowerShell script. To do this:
-
Copy the following PowerShell script and save it to a file with a .ps1 extension.
  ```powershell

  $ruleName = "My Rule" # TODO: Modify me

  # Connect to the Adaxes service
  $admNS = New-Object "Softerra.Adaxes.Adsi.AdmNamespace"
  $admService = $admNS.GetServiceDirectly("localhost")

  # Bind to the 'Business Rules' container
  $businessRulesPath = $admService.Backend.GetConfigurationContainerPath(
      "BusinessRules")
  $businessRulesContainer = $admService.OpenObject($businessRulesPath,
      $NULL, $NULL, 0)

  # Create a new Business Rule
  $rule = $businessRulesContainer.Create("adm-BusinessRule", "CN=$ruleName")

  # Triggering Operation: After updating an Approval Request
  $rule.ExecutionMoment = "ADM_BUSINESSRULEEXECMOMENT_AFTER"
  $rule.ObjectType = "adm-ApprovalRequest"
  $rule.OperationType = "set properties"
  $rule.Disabled = $False
  $rule.SetInfo()

  # Include All Objects in the Activity Scope of the Business Rule
  $scopeItem = $rule.ActivityScopeItems.Create()
  $scopeItem.BaseObject = $NULL
  $scopeItem.Type = "ADM_SCOPEBASEOBJECTTYPE_ALL_DIRECTORY"
  $scopeItem.Inheritance = "ADS_SCOPE_SUBTREE"
  $scopeItem.Exclude = $False
  $scopeItem.SetInfo()
  $rule.ActivityScopeItems.Add($scopeItem)

  # Save the Business Rule
  $rule.SetInfo()

  ```
-
In the script, $ruleName specifies the name of the Business Rule that will be created. Modify it per your requirements.
-
Copy the saved script to the computer where Adaxes service is installed.
-
On the computer where Adaxes service is installed, launch Windows PowerShell.
-
Navigate to the directory where you copied the PS1 file. For example, if you copied the script to the C:\Scripts folder, type:
  ```powershell
  cd C:\Scripts
  ```
-
Run the script using the following command:
  ```powershell
  .\Myscript.ps1
  ```

  where **Myscript.ps1** is the name of the **PS1** file created on the **1st** step.
-
Now, you need to add actions and conditions to the Business Rule. For this purpose, launch Adaxes Administration Console.
-
Navigate to and select the Business Rule with the name that you specified in $ruleName. You will find an empty Business Rule triggered After Updating an Approval Request.

-
First, you need to add actions to the Business Rule. Since the Business Rule is executed after updating an Approval Request, you should remember that the target object of the operation will be the Approval Request, not the user. As for accessing the user that is the target object of the Request, you can access the user's account with scripts. For example, the following script executed with the help of the Run a program or PowerShell script action sets the CustomAttributeText10 property of the user to Review Denied and disables the user:
 $targetUserAdsPath = $Context.TargetObject.TargetObject.ADsPath
 $targetUser = $Context.BindToObject($targetUserAdsPath)
 $targetUser.Put("adm-CustomAttributeText10", "Review Denied")
 $targetUser.AccountDisabled = $True
 $targetUser.SetInfo()
-
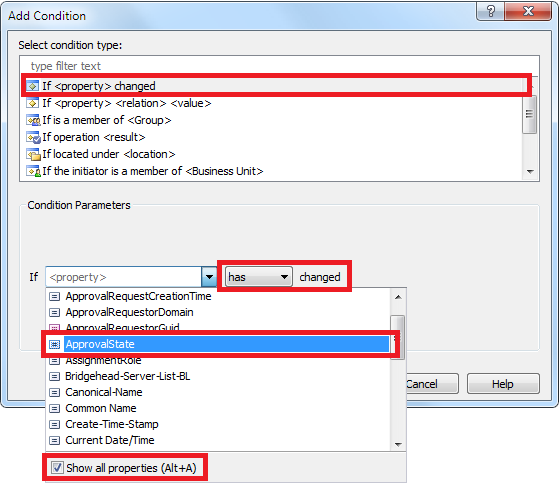
Now, you need to add conditions. Since denying an Approval Request actually means changing the ApprovalState property of the Request, we need to check whether the ApprovalState property has changed. Press the Add Condition button.

-
Select the If condition.
-
Expand the drop-down list.
-
Select the Show all properties option.
-
Select the ApprovalState property.
-
Select has changed and click OK.

-
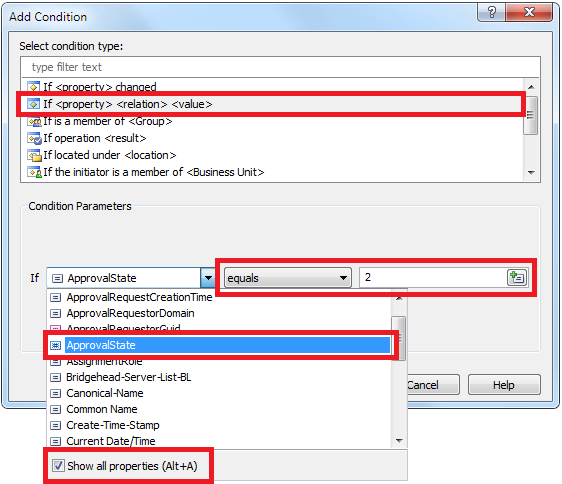
When you deny an Approval Request, the ApprovalState property of the Request is set to 2. So, we also need to check whether the ApprovalState property now equals 2. Press the Add Condition button again.
-
Select the If condition.
-
Expand the drop-down list.
-
Select the Show all properties option.
-
Select the ApprovalState property.
-
Select equals, type 2 and click OK.

-
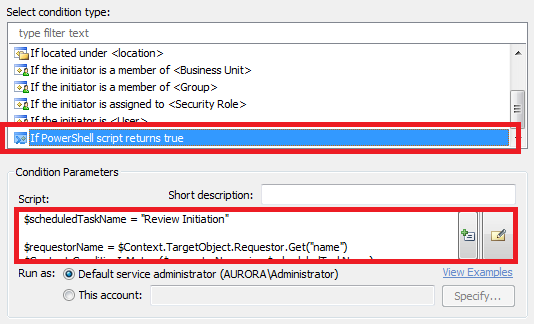
Now, the final check. We need to make sure that the Approval Request has been initiated by the 'Review Initiation' Scheduled Task. Press the Add Condition button again.
-
Select the If PowerShell script returns True condition.
-
Paste the following PowerShell script in the Script field.
 $scheduledTaskName = "Review Initiation"

 $requestorName = $Context.TargetObject.Requestor.Get("name")
 $Context.ConditionIsMet = ($requestorName -ieq $scheduledTaskName)

-
In the script, $scheduledTaskName specifies the name of your 'Review Initiation' Scheduled Task. Modify the script to your requirements.
-
Enter a short description for the script and click OK.
-
When finished, save the Business Rule and retire the Scheduled Task that now becomes unnecessary.