Hello,
Based on further tests, we've found out that it is impossible to select shared mailboxes in Exchange 2013, however in Exchange 2010 it is possible. When adding Exchange management to Adaxes, we based on Exchange 2013 as the latest version.
We've discussed this with our team and decided that in one of the future releases we'll make it possible to select shared mailboxes as recipients to whom mail is forwarded.
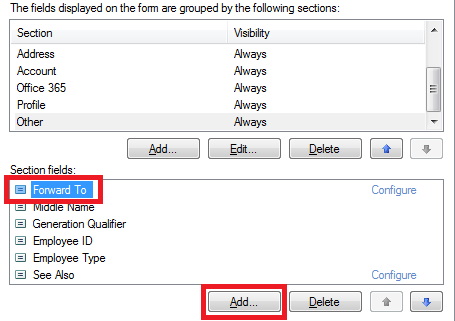
To work around this for now, you can allow users to modify the Forward To property, which is the same as setting a forwarding address in Exchange. To do this, you'll need to add the Forward To field to the form for modifying users. For information on how to customize the form, see the Customize Forms for User Creation and Editing Tutorial. Use it as a guide.
-
On step 5 of the Tutorial, select the Modify tab.

-
On step 6, you'll find information on how to add a field to the form. You need to add the Forward To field.

-
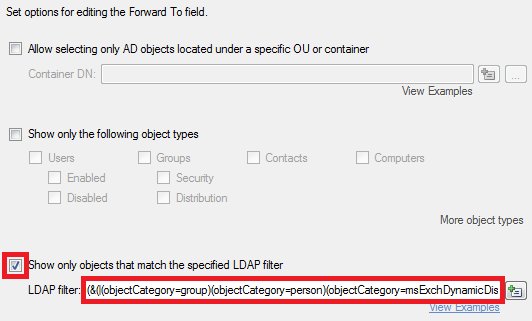
Once you add the field to the form, a dialog box appears where you can configure options for editing the Forward To property. By default, Adaxes does not filter the objects that you can select when editing the Forward To property in the Web Interface, which means that you'll be able to select any object, even if it cannot accept mail, for example, an Organizational Unit. You'll need to specify a LDAP filter that will allow selecting only objects that can accept forwarded mail. Select Show only objects that match the specified LDAP filter.
-
Specify the following filter in the LDAP filter edit box:
(&(|(objectCategory=group)(objectCategory=person)(objectCategory=msExchDynamicDistributionList))(mail=*)(mailNickname=*))

-
Click OK.
Alternatively, you can create a Home Page Action that will allow users to set a forwarding address for a mailbox. To create it, you'll need to configure a new Modify User action that allows editing the Forward To property only. For information on how to create such an action, see section Modify Object in the Configure Home Page Actions Tutorial. On Step 4 of the section, you'll find instructions on how to customize the form used by the action. Modify the form based on the instructions above in this post.