Hello,
The scripts are ready. To implement what you want, you can create a Home Page Action that will be executed on a user whose e-mail address you need to transfer to another user. For this Home Page Action, you'll need a property that allows specifying the user to whom the e-mail address is being transferred. For this purpose, you can use one of the properties supporting DN syntax that you don't use, for example, Assistant or Secretary.
Also, you'll need to create a Business Rule triggered after updating the property that will transfer the user's e-mail address to the user specified in the property. Also, it will save the address together with the date when it should be removed in a certain multivalued property of the receiving user, for example, CustomAttributeTextMultiValue1.
Finally, you can create a Scheduled Task that will run, say. once a day and check the CustomAttributeTextMultiValue1 property of each user. If the task finds an address that must be removed today, it will remove the address from the Email Proxy Addresses property of the user. Also, it will remove the record for the address from the CustomAttributeTextMultiValue1 property.
To implement such a solution:
I. Create a Home Page Action that allows transferring a user's e-mail address to another user
For information on how to create such Home Page Action, see section Modify Object on the 5th step of the following tutorial: http://www.adaxes.com/tutorials_WebInte ... htm#modify.
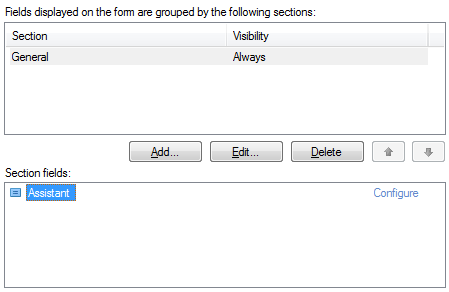
On Step 4 of the section, you will find instructions on how to modify the form used for the Home Page Action. You need to configure a form that allows to update only the property that will be used to specify the user who will receive the e-mail address, for example, Assistant or Secretary.
II. Create a Business Rule that transfers the e-mail address to the specified user
To transfer a user's e-mail address once the above home Page Action is executed, you need to configure a Business Rule that performs the necessary actions triggered after updating the property that you chose for the Home Page Action. To create such a Business Rule:
-
Create a new Business Rule.
-
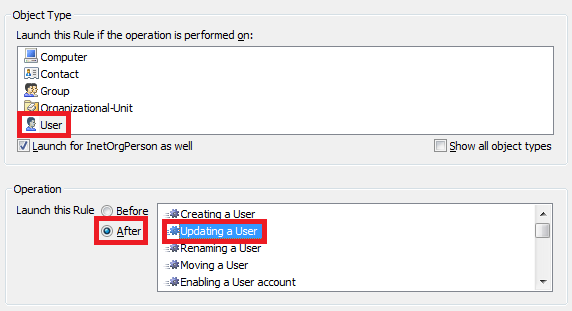
On the 2nd step of the Create Business Rule wizard, select User and After Updating a User.
-
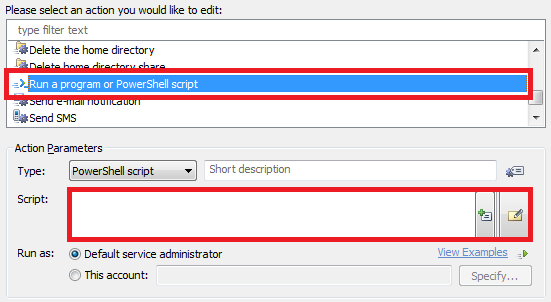
On the 3rd step, you need to add an action that transfer the e-mail address to the specified user. This will be done with the help of a PowerShell script. Thus, you need to add the Run a program or PowerShell script action and paste the below script in the Script field.
 $userDN = "%assistant%" # TODO: modify me
 $mail = "%mail%" # TODO: modify me

 if ([System.String]::IsNullOrEmpty($mail))
 {
     return # The user has no mail address
 }

 $mailboxParams = New-Object "Softerra.Adaxes.Adsi.Exchange.AdmExchangeMailboxParameters"
 $emailAddresses = $mailboxParams.EmailAddresses

 # Create a new e-mail address
 $emailAddress = $emailAddresses.CreateAddress("ADM_EXCHANGE_ADDRTYPE_SMTP", $null)
 $emailAddress.Address = "%mail%"
 $emailAddress.IsPrimary = $False

 # Add the e-mail address to the list of e-mail addresses of the receiving user
 $emailAddresses.Add("ADS_PROPERTY_APPEND", $emailAddress)
 $emailAddresses.OverrideOldValues = $False
 $mailboxParams.EmailAddresses = $emailAddresses

 # Save the changes
 $user = $Context.BindToObjectByDN($userDN)
 $user.SetMailParameters($mailboxParams, "ADM_SET_EXCHANGE_PARAMS_FLAGS_NONE")

 # Update the CustomAttributeTextMultiValue1 property of the receiving user with the new address
 $date = (Get-Date).AddDays(30).ToString("d")
 $user.PutEx("ADS_PROPERTY_APPEND", "adm-CustomAttributeTextMultiValue1", @("%mail%:$date"))
 $user.SetInfo()
-
In the script, $userDN specifies a value reference for the property that will be used to pass the user receiving the e-mail address. Specify a value reference for the property that you used in the Home Page Action.
-
Add a short description for the script and click OK.
-
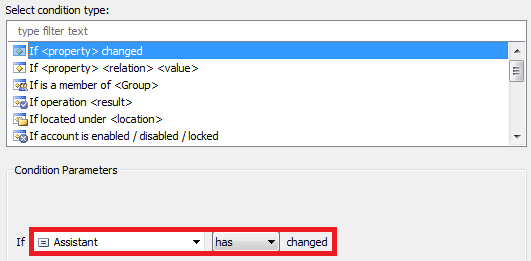
Now, you need to add a condition for the script to be run only when the property that you chose is modified. Right-click the action that you've just added and click Add Condition.

-
Select the If changed condition type.
-
Expand the drop-down list.
-
Select the property that you chose.
-
Select has changed.
-
Click OK.
-
Right-click the action that you've added and click Add Condition again.
-
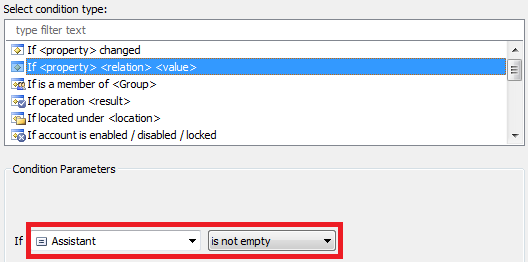
Select the If condition type.
-
Expand the drop-down list.
-
Select the property that you chose.
-
Select is not empty.
-
Click OK. You should get something like this:

-
Finish creation of the Business Rule.
III. Create a Scheduled Task that will remove the addresses
Now, you need to create a Scheduled Task that will remove the addresses on the day specified in CustomAttributeTextMultiValue1. To create such a Scheduled Task:
-
Create a new Scheduled Task.
-
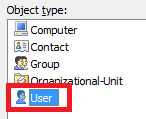
On the 3rd step of the Create Scheduled Task wizard, select the User object type.
-
On the 4th step, add the Run a program or PowerShell script action and paste the following script in the Script field.

 # Get all e-mail addresses that were assigned to the user on a temporary basis
 try
 {
     $addedMailAddresses = $Context.TargetObject.GetEx("adm-CustomAttributeTextMultiValue1")
 }
 catch
 {
     # No addresses assigned to the user
     return
 }

 $valuesToRemove = @()
 foreach ($mailAddressInfo in $addedMailAddresses)
 {
     $values = $mailAddressInfo.Split(":")

     # Find e-mail addresses to be removed right now
     $date = $values[1]
     $date = [System.DateTime]::Parse($date).ToLocalTime()

     if ($date.CompareTo([System.DateTime]::Now) -gt 0)
     {
         # The address will be removed in the future, skip it for now
         continue
     }

     # Create an object that represents the address to be removed
     $mailboxParams = New-Object "Softerra.Adaxes.Adsi.Exchange.AdmExchangeMailboxParameters"
     $emailAddresses = $mailboxParams.EmailAddresses

     $emailAddress = $emailAddresses.CreateAddress("ADM_EXCHANGE_ADDRTYPE_SMTP", $null)
     $emailAddress.Address = $values[0]
     $emailAddress.IsPrimary = $False

     # Mark that the address will be deleted
     $emailAddresses.Add("ADS_PROPERTY_DELETE", $emailAddress)
     $emailAddresses.OverrideOldValues = $False
     $mailboxParams.EmailAddresses = $emailAddresses

     # Commit the changes
     $Context.TargetObject.SetMailParameters($mailboxParams, "ADM_SET_EXCHANGE_PARAMS_FLAGS_NONE")

     # Mark the value to be removed from the CustomAttributeTextMultiValue1 property
     $valuesToRemove += $mailAddressInfo
 }

 # Update the CustomAttributeTextMultiValue1 property
 if ($valuesToRemove.Length -ne 0)
 {
     $Context.TargetObject.PutEx("ADS_PROPERTY_DELETE", "adm-CustomAttributeTextMultiValue1", @($valuesToRemove))
     $Context.TargetObject.SetInfo()
 }
-
Add a short description for the script and click OK.
-
Finish creation of the Scheduled Task.
IV. Modify the display name for the property used
Since the name of the property that you'll use, such as Assistant or Secretary, will not tell much to your users on the meaning and the function of the field in the Home Page Action, you'll probably want to give the property your own name. For information on how to do this, see Customizing Display Names for AD Properties.